The crochet-a-long: finally finished!

Well, it only took me six months instead of the two that the Woodland Blanket crochet-a-long was originally planned to last, but I finally finished!

Holy crap, it’s done!

I’ll admit, some of why it took so long to finish was because I kept getting distracted by other projects.  Which happens a lot to me, and which is why I’ve got piles of unfinished stuff all over the house. (From what I can think of off the top of my head, I’ve got two unfinished cardigans, two unfinished pairs of socks, one shawl I’m actively knitting, one I’ve got stashed in a box until I feel like working on it again, a third that’ll be the focus of a blog post next week, and a pile of stuff in the “Corner of Shame” that will probably never get done.)  And the more I let the Woodland Blanket sit forlornly in my craft basket, the guiltier I felt about not finishing it, especially with so many other projects I wanted to do.  And I only had 8 stripes and the border left to do.  So I sat down one weekend and cranked it out.

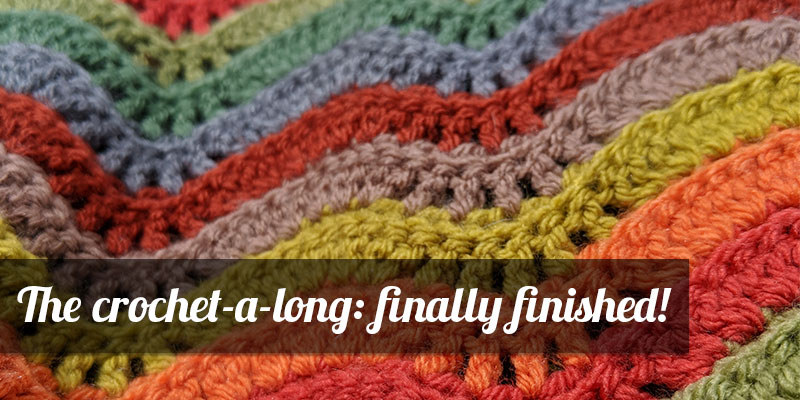
The border came out really well – I’ve never done a border like this before, it’s simply a couple of rounds of slip stitches.

It’s not a hard blanket to do at all, especially once you get the hang of translating UK crochet terminology.  The wave pattern is soothing and rhythmic to work on, and I absolutely love the colors.  The whole blanket looks fantastic, and I’m glad I resisted the temptation to just stop a few rows short from the end and call it done.  It’s the first big thing I’ve finished in a while, and I’m so proud of myself for sticking with it.

I especially love the gradual change from warm tones to cool blues.

If you’re interested in making one of your own, the pattern is free on Attic24 (there are plenty of pictures included that walk you through the pattern) and if you want to create it in the same color scheme, you can buy the yarn pack here.

How to stretch vinyl boots (carefully)

A couple of weeks ago, I rambled about how I was so incredibly excited that I was finally going to have a pair of Sailor Moon boots to call my own.  The boots showed up on Monday, and I excitedly went to try them on, only to find out…

…that my calves were a little too muscular for these boots.  Curse you, muscular calves! (Well, not really, I like my calves.)

I ended up messaging the seller (Catzia) telling her the boots didn’t fit my calves, and I asked if I could exchange them for a larger size in hopes that they might fit my legs better.  She said she’d be happy to exchange them, but before doing that, I should try to stretch the boots out using a hair dryer to see if I could get them stretched out enough to fit. And it worked!  They were snug, but I could zip them up all the way!

While I was waiting to hear back from Catzia, I found a number of “how to stretch shoes” tutorials out there. When I came across the hair dryer method, I figured it’d work for the boots (but didn’t want to try it until I’d heard back from Catzia) – but most of these methods focused on making the foot area of a shoe wider, not necessarily the calves.  And they all focused on leather shoes, and not vinyl boots.

Enter The Crafty Nerd, armed with a hair dryer and a pair of epic Sailor Moon boots.

Continue reading →

A brief (and random) interlude: good things about this week

I swear, I had a real post written up for yesterday.  It was only missing some photos, ones I had to take as I do the tutorial I’m hoping to share with you all soon (probably next week at this point, though).  I got it all written Wednesday night.  I was going to take the photos on Thursday, and post it on Friday, and keep up my posting streak of one post a week.  I had this.

And then my brain intervened, and said “oh we’re not going to do that, we’re not going to do anything but knit when you’re not at work, knit and feel miserable.”

Thursday ended up being a pretty rough day, and Friday wasn’t much better.  So here I am on Saturday morning, at 7 am, not wanting to break my posting streak.  So, instead of a tutorial, or cosplay planning, I’m going to share some of the good things that happened this week.  Because this week wasn’t just full of my brain being ridiculous like it tends to be at times.  There were some cool little things that happened that made me smile.

Please ignore my scruffy bath mat and oddly lit legs, my phone apparently decided that the boots were the only thing that needed a correct color.

First off, I got my Sailor Moon boots in the mail this week.  There was a little bit of frustration with them at first – they didn’t come close to fitting my calves – but the owner of the Etsy shop I bought them from told me how to stretch them so they’d fit, and it worked! (Obviously, otherwise I wouldn’t have been able to take this picture.)  They look so fantastic, and I can’t wait for Gen Con so I can wear them around the convention on Saturday.

Peridot and Lapis, together again on the back of my car!

I also finally got a Peridot decal to go with the Lapis decal on the back of my new car!  (who is also named Lapis – that’s a story for another time though)  A friend of mine from work, Jake, makes vinyl decals, and when I couldn’t get the original decals I’d bought for Old Lapis because the seller’s Etsy store was on (seemingly permanent) vacation, I sketched up some stuff in Illustrator and had Jake make me some decals.  They came out really well!

And it’s not exactly a nerdy thing, but I can’t help but show off one of my kitties, Hannah, who was trying to make me feel better last night when I hit a rough patch:

My sweet, photogenic girl.

Isn’t she beautiful?  She curled up next to my feet after this and slept there all night.   (And then decided to use me as a landing pad early this morning when she jumped out of the window above the bed, oof.)  She doesn’t often snuggle with Ross and I, especially not in the summer, so it was an extra special treat to get Hannah snuggles last night.

Here’s hoping next week will be better.  At the very least, I’ll have more than enough time to get that tutorial I’ve been working on finished by Thursday or Friday.

Sailor Moon at Gen Con: it’s actually happening

This has been hanging on my craft room door since last Halloween, reminding me that this is going to be probably my one big cosplay for Gen Con this year.  I’ve actually been a little afraid to ramble about the costume on the blog, because every time I say “oh hey I am SO GOING TO COSPLAY AS THIS” on the blog, it never happens.  (Like Toothless.  And Rose Quartz.)

This one is actually going to happen, though.  I mean, I’m too close to having a completed costume for this to just say “eh, maybe next year”.  I’m remembering how I felt at Halloween when I put on this costume, when my inner sixteen-year-old let out a near-constant fangirl squeal every time I looked in a mirror.  I saw myself and said “I am Sailor Moon.”

This is one happy Crafty Nerd, you guys.

For me, this is huge.  I’ve done a bunch of Sailor Moon costumes over the years.  I made one by hand during my senior year of high school (and I do mean by hand, I lost sewing machine privileges during the middle of that project and some parts were held together by staples). I found a pre-made Sailor Moon costume at a Spencer’s back during my sophomore year of college — it was a child’s XL, I had to cut the bodysuit out to make it fit and wore it all over a white t-shirt.  I made a Sailor Jupiter costume for I-CON 2006 that turned out really impressively, and I wish I’d hung onto it because it was the best hand-sewn costume I’d made up to that point.

This year, I’m going to have a costume that’s well put together, that I won’t have to worry about falling apart because of my iffy hand-sewing skills.  It won’t have staples in it.  It won’t be a cobbled together collection of whatever I can find that’s “close enough” to certain costume pieces that I can’t make on my own or afford to buy somewhere.

There are three pieces I still need to get for my costume — one I just bought and am waiting for it to be shipped, one I’m pestering a friend for on Tuesday, and the third I think I could get away without if I need to.

The first thing, and something I’ve never actually had for a Sailor Moon costume before: the boots.

Oh my lord, they’re so beautiful.

I found these boots on Etsy, in the shop Catzia’s Collectibles.  This shop is full of beautiful Sailor Moon cosplay accessories, and I can’t wait to get the boots and see how they feel.  I’ll definitely want to break them in before Gen Con, so I don’t accidentally destroy my feet like I’ve done with just about every costume I’ve worn that involves heels.  (I wonder if I could get away with wearing these under jeans for work, haha.)  I’m ridiculously excited about these boots, you guys.  I’ve done Sailor Moon costumes with plain red heels, with black flats, even with a pair of grey and black Mary Janes with Sailor Moon socks.  I’m gonna have actual boots for this costume.  Sixteen-year-old me could cry happy tears right now.

The next is the wig.

Even this well-loved Sailor Moon wig is awesome.

I’ve told you about my wonderful wig-making neighbor before — and Oriana is hopefully going to start work on my very own Sailor Moon wig soon, which has me ridiculously excited.  (You need to see her Queen Beryl – I’m really hoping she brings that to Gen Con, it’s such a fantastic costume!  At the very least, maybe we can throw on costumes and do a photoshoot in our neighborhood.  I’m pretty sure most of our neighbors won’t even bat an eye.)

The last thing I need is the wand.

For an unofficial wand, this looks pretty darn good!

There are lots of places I could get a Sailor Moon wand. I’m kind of kicking myself for selling my old Cutie Moon Rod years ago, and I miss my old Crescent Moon Wand (which had an untimely demise due to a friend accidentally stepping on it, it’s my fault for leaving it on the floor).  I could hope to win an auction on eBay for an older Sailor Moon wand like the one I had in high school, or I could spend a stupid amount of money on a Proplica wand.  (And if I did buy a Proplica wand, I’d be terrified to bring it to Gen Con because what if something happened to it?  Then I’d be out $100, and I’d be a very sad Crafty Nerd.)  The pictured wand is one I might get, if I do decide to go with a wand. It looks pretty close to the original wand. While it’s a little expensive for something that’s not an official Sailor Moon item, it’s still better than worrying about breaking a Proplica wand on accident or going with modifying a bootleg toy to look a little more official.

You guys.  This costume is actually happening.  I am actually going to wear a Sailor Moon costume to a convention and not be slightly embarrassed by it because it’s not perfect.  Because this costume is going to be just about perfect.  And I can’t wait to wear it.

Four crafts to try this summer

With the warmer temperatures arriving here in Bloomington, I’ve been looking for crafts to do that don’t involve me being buried under a pile of yarn — and I’m sure a number of you folks out there reading this are too. Or, you might just be looking for some new crafts to try out, to add some variety to your crafting life! So, based on a blog post suggestion from my friend Katherine, I’ve come up with a couple of fun summer crafts to try out. Some of these might not be new to you, but you might end up finding some new techniques to try out for some of these crafts!

Make a hand-carved wood sign

This idea I got from Kasi while we were camping together at a festival recently. A bunch of us were crafting around the fire, mostly knitting, and we joked that we should call ourselves the Crafter Circle — and that prompted Kasi to try her hand at making a sign for us, using wood carving tools to carve the letters out of the sign.

Almost done – just needs some paint for the word “crafter”!

It’s a work in progress, as you can see, but it’s looking pretty awesome so far – especially for this being Kasi’s first time doing wood carving!

To get started with something like this, you’ll need wood carving tools (which you can get at craft stores like Michaels or Jo-Ann’s), a blank wood sign, some paint or wood stain (depending on how you want to finish it), and a pencil to sketch out your design with. Check out this tutorial on DoItYourself.com for a quick guide on how to get started.

Dye your own yarn

I’ve been wanting to dye my own yarn forever, and this summer, I think I’ll finally get the chance.

Look at all these lovely colors! (Image from Fiber Arts Bootcamp.)

For me, this would definitely be an outdoor craft, since I know I’ll end up making a mess — I mean, come on, every time I try to dye my hair at home, it looks like someone got murdered in my bathroom, what with all the red hair dye that ends up everywhere. This guide from Darn Good Yarn should help you get started with dying your own yarn at home.

Make a crochet mandala

Crochet mandalas seem to be all the rage today — and with it being too hot to do much yarn work with anything bigger than a sock, making a mandala might help keep your hands busy with without you overheating in the process. Lucy from Attic24 has made some lovely mandalas in hoops, as you can see in the following picture.

Mandalas made by Lucy of Attic24.

You can also make some non-hooped mandalas of varying levels of intricacy – check out this post on The Crochet Crowd for some free mandala patterns. Lucy also has a tutorial on how to make hooped mandalas on her blog.

Tie-dye all sorts of things

Okay, so I already mentioned dying yarn, but tie-dying is a little bit different… plus, tie-dying is a craft that I’m definitely not new to. I used to work as a camp counselor during the summers when I was in high school and college, and more often than not, I’d lead the tie-dying evening activities. In the process, I learned you can tie-dye just about anything — shirts, socks, pants, bandannas, pillow cases, bed sheets… if it’s made out of cotton fabric, you can tie-dye it.

Photo of a rainbow-colored tie-dye t-shirt.

T-shirts are just the beginning!

There are lots of ways to tie-dye things, and many different dyes and processes you can use. At summer camp we’d use Rit dyes, but they tended to fade pretty quickly if the garment was worn often, so I’d suggest stronger dyes if you want something that will last. Jo-Ann’s has an awesome tie-dye t-shirt technique guide that’ll help you get started, if you want to have some fun with tie-dying your clothes (and bedding, and random quilt fabric, and other miscellaneous items).

These are just a handful of fun crafts you could try out this summer — if you’ve got suggestions of your own, share them in the comments!