Sheet of paper with the words "Fountain pens: My new obsession" written on it, with a fountain pen laying on top of the paper.

Fountain pens: my new obsession

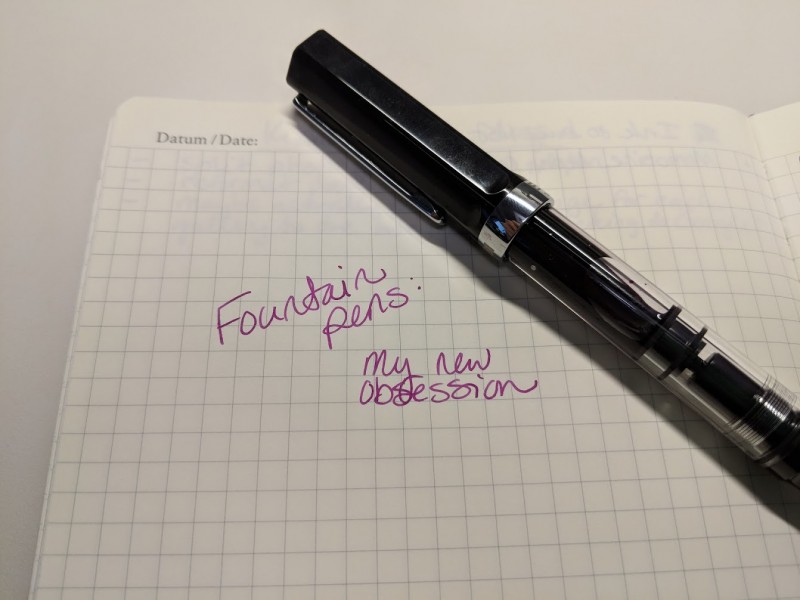
I’ve fallen into a new… hobby? obsession? Whatever it is, it ties in nicely with my bullet journalling hobby (yes, I’m still keeping up with that!), and given my love for pens, color, and fancy paper, I’m not surprised I fell into this hobby.

Calling it a new obsession isn’t exactly truthful, though – I was always really intrigued by my dad’s fountain pens when I was a little girl. They were so fancy! And my dad would do silly things like draw smiley faces on my fingers and toes with his fountain pens. It always made me laugh when he’d do that.

Pointer finger with a smiley face drawn onto it.

Just like my dad used to do, haha.

When I was a little older, maybe in my teenage years, I decided that someday, I’d own a fountain pen, just like my dad. And, well, now I own six!

Photo of six fountain pens - two Pilot Metropolitans, a TWSBI Eco, and three Pilot Kakunos.

From left to right: two Pilot Metropolitan Retro Pop pens, a TWSBI Eco, and three Pilot Kakuno pens.

What’s interesting about writing with fountain pens is that they all feel slightly different – it’s almost like they have personalities of their own. My green Metropolitan Retro Pop feels like it’s grumpy, and isn’t always the smoothest to write with. (That might be because when I first bought it, I only used it a little bit, then let it sit for two years to dry up… At least I learned how to clean fountain pens, thanks to Green Metro!) My clear Kakuno feels precise, peppy, and energetic. The purple and white Kakuno feels welcoming, friendly, and stable.

Oh god, I’m ascribing personalities to my fountain pens. Please send help. 🤣

More seriously, though, they make writing much more fun, whether it’s for work, in my bullet journal, or in a letter to a friend. I have a different color of ink in each pen, and even more colors to choose from if I want to switch out the ink I’m using. (The Goulet Pen Company’s little ink samples are perfect – I get to try out lots of different colors, and if I find one I love I can buy a big bottle of it.)

It’s been really hard resisting the urge to buy more pens and ink.  My wish list on Goulet Pens just keeps growing and growing, haha.

Screenshot of part of my Goulet Pens wishlist, containing a couple of different pens and bottles of ink.

This isn’t even my entire wish list!

I’m looking forward to seeing what other things I can do with fountain pens aside from writing a lot and playing with different ink colors.  Having fancy pens to write with might actually get me working on making my handwriting neater, at least. 🙂

The crochet-a-long: finally finished!

Well, it only took me six months instead of the two that the Woodland Blanket crochet-a-long was originally planned to last, but I finally finished!

Holy crap, it’s done!

I’ll admit, some of why it took so long to finish was because I kept getting distracted by other projects.  Which happens a lot to me, and which is why I’ve got piles of unfinished stuff all over the house. (From what I can think of off the top of my head, I’ve got two unfinished cardigans, two unfinished pairs of socks, one shawl I’m actively knitting, one I’ve got stashed in a box until I feel like working on it again, a third that’ll be the focus of a blog post next week, and a pile of stuff in the “Corner of Shame” that will probably never get done.)  And the more I let the Woodland Blanket sit forlornly in my craft basket, the guiltier I felt about not finishing it, especially with so many other projects I wanted to do.  And I only had 8 stripes and the border left to do.  So I sat down one weekend and cranked it out.

The border came out really well – I’ve never done a border like this before, it’s simply a couple of rounds of slip stitches.

It’s not a hard blanket to do at all, especially once you get the hang of translating UK crochet terminology.  The wave pattern is soothing and rhythmic to work on, and I absolutely love the colors.  The whole blanket looks fantastic, and I’m glad I resisted the temptation to just stop a few rows short from the end and call it done.  It’s the first big thing I’ve finished in a while, and I’m so proud of myself for sticking with it.

I especially love the gradual change from warm tones to cool blues.

If you’re interested in making one of your own, the pattern is free on Attic24 (there are plenty of pictures included that walk you through the pattern) and if you want to create it in the same color scheme, you can buy the yarn pack here.

How to stretch vinyl boots (carefully)

A couple of weeks ago, I rambled about how I was so incredibly excited that I was finally going to have a pair of Sailor Moon boots to call my own.  The boots showed up on Monday, and I excitedly went to try them on, only to find out…

…that my calves were a little too muscular for these boots.  Curse you, muscular calves! (Well, not really, I like my calves.)

I ended up messaging the seller (Catzia) telling her the boots didn’t fit my calves, and I asked if I could exchange them for a larger size in hopes that they might fit my legs better.  She said she’d be happy to exchange them, but before doing that, I should try to stretch the boots out using a hair dryer to see if I could get them stretched out enough to fit. And it worked!  They were snug, but I could zip them up all the way!

While I was waiting to hear back from Catzia, I found a number of “how to stretch shoes” tutorials out there. When I came across the hair dryer method, I figured it’d work for the boots (but didn’t want to try it until I’d heard back from Catzia) – but most of these methods focused on making the foot area of a shoe wider, not necessarily the calves.  And they all focused on leather shoes, and not vinyl boots.

Enter The Crafty Nerd, armed with a hair dryer and a pair of epic Sailor Moon boots.

Continue reading →

Four crafts to try this summer

With the warmer temperatures arriving here in Bloomington, I’ve been looking for crafts to do that don’t involve me being buried under a pile of yarn — and I’m sure a number of you folks out there reading this are too. Or, you might just be looking for some new crafts to try out, to add some variety to your crafting life! So, based on a blog post suggestion from my friend Katherine, I’ve come up with a couple of fun summer crafts to try out. Some of these might not be new to you, but you might end up finding some new techniques to try out for some of these crafts!

Make a hand-carved wood sign

This idea I got from Kasi while we were camping together at a festival recently. A bunch of us were crafting around the fire, mostly knitting, and we joked that we should call ourselves the Crafter Circle — and that prompted Kasi to try her hand at making a sign for us, using wood carving tools to carve the letters out of the sign.

Almost done – just needs some paint for the word “crafter”!

It’s a work in progress, as you can see, but it’s looking pretty awesome so far – especially for this being Kasi’s first time doing wood carving!

To get started with something like this, you’ll need wood carving tools (which you can get at craft stores like Michaels or Jo-Ann’s), a blank wood sign, some paint or wood stain (depending on how you want to finish it), and a pencil to sketch out your design with. Check out this tutorial on DoItYourself.com for a quick guide on how to get started.

Dye your own yarn

I’ve been wanting to dye my own yarn forever, and this summer, I think I’ll finally get the chance.

Look at all these lovely colors! (Image from Fiber Arts Bootcamp.)

For me, this would definitely be an outdoor craft, since I know I’ll end up making a mess — I mean, come on, every time I try to dye my hair at home, it looks like someone got murdered in my bathroom, what with all the red hair dye that ends up everywhere. This guide from Darn Good Yarn should help you get started with dying your own yarn at home.

Make a crochet mandala

Crochet mandalas seem to be all the rage today — and with it being too hot to do much yarn work with anything bigger than a sock, making a mandala might help keep your hands busy with without you overheating in the process. Lucy from Attic24 has made some lovely mandalas in hoops, as you can see in the following picture.

Mandalas made by Lucy of Attic24.

You can also make some non-hooped mandalas of varying levels of intricacy – check out this post on The Crochet Crowd for some free mandala patterns. Lucy also has a tutorial on how to make hooped mandalas on her blog.

Tie-dye all sorts of things

Okay, so I already mentioned dying yarn, but tie-dying is a little bit different… plus, tie-dying is a craft that I’m definitely not new to. I used to work as a camp counselor during the summers when I was in high school and college, and more often than not, I’d lead the tie-dying evening activities. In the process, I learned you can tie-dye just about anything — shirts, socks, pants, bandannas, pillow cases, bed sheets… if it’s made out of cotton fabric, you can tie-dye it.

Photo of a rainbow-colored tie-dye t-shirt.

T-shirts are just the beginning!

There are lots of ways to tie-dye things, and many different dyes and processes you can use. At summer camp we’d use Rit dyes, but they tended to fade pretty quickly if the garment was worn often, so I’d suggest stronger dyes if you want something that will last. Jo-Ann’s has an awesome tie-dye t-shirt technique guide that’ll help you get started, if you want to have some fun with tie-dying your clothes (and bedding, and random quilt fabric, and other miscellaneous items).

These are just a handful of fun crafts you could try out this summer — if you’ve got suggestions of your own, share them in the comments!

Getting back into sewing

I’m pretty sure you folks all know I love to sew.  I’ve rambled about it a number of times on the blog.  Unfortunately, I haven’t really done much of it lately — largely because I don’t really have space to permanently set up my sewing machine.  It’s kind of a pain in the butt to set my sewing space up in the kitchen, sew for a few hours, and then take it all back down because we need to eat.  And unless I want to try to sew standing up, with the sewing machine perched on my giant dresser, there’s not really space to set it up in my craft room.

Not pictured: the messy bed with the cat sprawled on top of it, or the huge dresser covered in a mess of craft supplies.

Eventually I’ll have the space, since I’m planning on getting rid of the giant dresser (which takes up nearly an entire wall) and getting a much more reasonably sized one from Ikea at some point, and rearranging the furniture that’s left.  However, that’s going to involve some help from friends and a trip up to Fishers to get a new dresser, and a number of other things that I can’t quite get done right away.

In the meantime, I figured out a space where I can semi-permanently set up my sewing machine!  You’ll probably laugh, but hey, it’s working out pretty well for me.

My tiny sewing studio, complete with Super Mario trash can, motorcycle, and ugly garage floor. (I never said this was a glamorous studio!)

Yes, I’ve set up my sewing machine in the garage, of all places. Sure, it smells a little bit like motorcycle fumes when it gets warm in there, but I don’t mind it.  I have both my sewing machine and my ironing board set up at the same time, and can switch between them easily — which is wonderful.  When I try to set everything up in the kitchen, inevitably I end up tripping over something or knocking something over.  I used to flop the ironing board on top of the washer and dryer, but since Ross and I got new ones last year with rounded tops, I can’t quite iron in the laundry room anymore.

It’s actually not so bad, sewing in the garage.  Sure, it doesn’t look glamorous at all, but since when do all craft rooms have to be shiny and pretty and Instagram-worthy?  And I have the added benefit of being able to enjoy lots of fresh air, since I can just open up the garage door and practically be sewing outside.

Lapis: “can I help? 😀 “

Plus, that means I can sew with New Lapis! Who I’ll probably ramble about in more detail at a later date.  After all, she is The Crafty Nerdmobile!  (And once a month, she’s Lappy the LARPmobile too.)

Anyway, I’ve managed to put my sewing studio to good use so far — I’ve started work on a disappearing 9-patch quilt, and I’m to the part where I can start sewing the completed squares together.

The start of the disappearing 9-patch square — this is before I chopped it all up.

I’m really impressed with how these squares are coming out, on most of them the seams are lining up perfectly.  I learned some new quilting techniques (or, more accurately, ironing techniques) that really helped with this.  I didn’t know until recently that when you’re working with quilt squares, you shouldn’t iron them like you’d typically iron a shirt or other sewing projects.  Instead, you just flop the iron down on the seam you want to press flat and let gravity do the work.  I’ve been setting the iron on the seam for a few seconds, then lifting it and setting it further down, and it’s working out really well for me.

And here’s the square after! Doesn’t it look fantastic?

I think once I’m finished with this quilt, I might actually get working on the Sailor Moon quilt again – which also might end up being a disappearing 9-patch as well.  This pattern is fun, and ends up looking really nice when it’s done.  Not sure what I’ll do with either of these quilts when they’re finished, as I’m starting to run out of places to put them, but I’ll figure it out eventually.

I missed sewing.

How to make your dragon a shawl: part 1

Recently, I finally got brave enough to try making the Wingspan Shawl – while I’ve been knitting for… gosh, nearly 25 years, I’ve never really been confident in my skills beyond the the garter stitch until recently.  Now that I’ve made a number of pair of socks, though, I figured I could finally tackle the Wingspan Shawl.  I’ve been wanting to try it for years, and so I decided to try my hand at it with some yarn I picked up at a trunk show recently.  (It’s Blackberry Brambles by Oink Pigments, for those curious!)

Shawl that somewhat resembles a dragon wing, in shades of cream, pink, blue, and green.

Doesn’t this look lovely?

Once I got into the swing of things, I found out I really love working this pattern – it’s just interesting enough to keep me from getting bored, but simple enough that I can work it while watching TV.  I chugged through quite a bit of this wingspan shawl, but then encountered a problem: I ran out of yarn.

Toothless the Dragon from How To Train Your Dragon, with a grumpy look on his face.

“… are you telling me we’re out of yarn?”

While I was working on the Blackberry Brambles wingspan, though, I had an idea: I could make a Toothless-inspired wingspan shawl, with most of the shawl being black and the last two panels being red, like Toothless’s tail.

Toothless the Dragon from How To Train Your Dragon, showing his red prostetic tail fins.

Yeah, it’s his tail and not his wing (like the shawl’s name), but hey, it works, right?

So while I waited for my next skein of Blackberry Brambles to get here from Oink Pigments, I went to Jo-Ann’s and snagged some red and black yarn and whipped up this awesome little shawlette:

Plush Toothless the Dragon, sitting on the floor next to a shawl that resembles a dragon's wing.

It turned out really well, I think! I might be biased, though.

It’s not quite finished, yet – I want to add the dragon insignia that’s on Toothless’s tail fin, but that’ll involve another trip out to the craft store for some felt.  Once I’ve got that added, I’ll share the finished product with you all, as well as the template I create for the dragon insignia and instructions for how to add it to your own wingspan shawl!

The crochet-a-long, two-ish months later

Well, the Woodland Blanket crochet-a-long I posted about a little while ago came to a close a few weeks ago.  How’s my blanket looking, you ask?

Blanket in multiple colors draped over a basket.

It’s definitely a blanket!

Well, even though the crochet-a-long wrapped up recently, I’m still 11 or 12 stripes away from finishing the blanket.  I managed to keep up with the rest of the group pretty well for the first month or so, and then my ADHD caught up with me and my brain said “hey, let’s find something else to work on, we’ve worked on this blanket for like a month straight, so let’s do something new and exciting!”

So I started a pair of socks.

Beginning of a knitted sock, roughly three inches long.

This sock is much further along now, I’ve rounded the heel at this point!

And then I dug out a cardigan that I’d started a few years ago and hadn’t finished yet.

Close-up of crochet stitchwork that's part of a cardigan.

It still looks like an amorphous blob at this point, but the stitch pattern is pretty.

And then I decided to go back to another pair of socks I was working on and do some work on those.

Two socks, one still being knitted, only completed up to the heel of the sock.

This pair is actually pretty close to being finished!

And then I felt guilty about not working on the blanket and went back to working on that for a little bit, but then got distracted by socks again.  I know I’ll finish that blanket soon – I keep telling myself that I’ll finish it after I finish the socks with the zigzag pattern, that I won’t start any more projects until I get some others finished.  Will I actually be able to stick to that, though? Who knows.

Anyhow, I’ll post about the blanket when I get it finished, I promise.  And I will get that finished.  I’m determined.

Five more free nerdy cross-stitch patterns

Everybody loves free things, and especially free cross-stitch patterns!  So, here, have another collection of free nerdy cross-stitch patterns.

Rick and Morty Big Heads

Preview of Rick and Morty Big Heads cross-stitch pattern

Because everyone loves Rick and Morty, here’s a pattern of our favorite dysfunctional interdimensional travelers.

Home Is Where My Butt Is

Cross-stitch pattern with a cat on a couch, with the caption Home is where my butt is.

Oh, Pusheen.  So cute and sassy.

Navi in a Bottle

Cross-stitch pattern of a little fairy in a bottle, with the text Hey Listen.
Because sometimes, you just want to cram Navi in a bottle.

Bowie Cross-Stitch Pattern

Cross stitch pattern of David Bowie, with the lightning bolt on his face from Aladdin Sane.
A little bit of Bowie is always good.

Totoro Bookmark Cross-Stitch Pattern

Image of a cross-stitch bookmark featuring Totoro.

I’ll let you all in on a little secret… I actually still haven’t seen My Neighbor Totoro yet.  I know, it’s shocking!

Five awesome nerdy DIY projects

Stuck home on a rainy weekend with nothing to do?  Looking for something fun to make for your home office or living room?  Check out this roundup of five awesome nerdy do-it-yourself projects to help make your home a little extra nerdy.

DIY D20 Lamp from Our Nerdy Home


This incredibly easy IKEA lamp hack would make an awesome addition to your office, game room, or anyplace else that needs a little extra light.  And with the materials costing less than $25, this is a relatively inexpensive project!  (Which is always good, so you can save some money for more games, right?)  🙂

Don’t Panic Towel Messenger Bag from Nerd By Night

Alright, this is something I’m probably going to have to make for hauling around Gen Con goodies.  I think this is quite possibly the nerdiest bag I’ve ever seen – and I need it in my life.  I mean, come on, a Hitchhiker’s Guide to the Galaxy themed bagmade from a towel.  And for the cost of a towel, you can be a hoopy frood with a towel bag of your very own.

Light Up and Talking PotatOS from Portal 2, by codename-3c

Looking for something a little more complicated to make?  Why not try your hand at this talking PotatOS from Portal 2?  (Note: there are spoilers for Portal 2 in the instructions for this project, so keep that in mind if you haven’t played it yet!)  I’m half tempted to try making this for Ross.

Geek Welcome Mats from Our Nerd Home

Our Nerd Home has a lot of awesome DIY projects on their site – and this is another awesome project of theirs!  These geeky welcome mats look relatively simple to make, and you could easily do all sorts of designs with this technique!  (I’m imagining Rainbow Dash’s cutie mark as one idea for a welcome mat…)

DIY Comic Book Lamp from A Girl and A Glue Gun


I like this comic book lamp project. It looks like it’d be a lot of fun to do with not just old comic books, but all sorts of nerdy artwork – and you could easily just make a new lampshade for an existing lamp, or snag a lamp from a thrift store that needs a little bit of TLC!

Hopefully these five project ideas might spark your DIY side and give you some ideas for fun stuff to make the next time you’re bored and looking for something creative to do!  I know I’ve got some ideas, that’s for sure.

The Crafty Nerd tries a crochet-a-long

Did you folks know I’ve never, ever done a crochet-a-long before?  Ever?

Well, that changed at the beginning of January – and I’m having a lot of fun with it.  For those curious, I’m taking part in the Woodland Blanket Crochet-a-Long, led by Lucy of Attic24.  Kasi suggested we do the crochet-a-long together, and so we bought the yarn in December and waited.

This bag of yarn taunted me for weeks.

And on January 5th, the Woodland Blanket crochet-a-long started!  And I did a first for me – I made a gauge swatch before jumping headlong into a blanket.

And it was exactly the size it needed to be!

I was ridiculously excited that the gauge swatch turned out exactly as it should – and I jumped right in after that, and crocheted until my wrist hurt.  It’s been a while since I crocheted anything, what with my recent obsession with sock making, hah, and my wrist was out of practice.

Steve’s been really enjoying me crocheting, too.  A warm human, sitting still for hours while making a thing to snuggle under? Count him in.

I think he’s already claimed the blanket as his own.

And I’ll admit, instead of writing blog posts, I’ve been crocheting furiously and hanging out around the Facebook group for the crochet-a-long.  There are so many pretty blankets being showed off there, and I love seeing all the different ways people are working with the colors and following their own path through the crochet-a-long.  It’s almost addicting, working on the blanket and looking at others’ blankets as they’re in progress.  The pattern for this blanket has a nice rhythm to it, and the colors we’ve all been working with the past few weeks are delightfully warm and have really brightened up the recent string of snow days I’ve had.

The best thing to do on a snow day: crochet and drink chai.

I’ll post about the blanket again closer to when it’s finished, so I don’t end up overwhelming everyone with blanket posts like I’ve been doing on Instagram.  It’s been a great project to unwind with when I get home from work.  Especially on days like today, when I had one of the least pleasant commutes home ever – I’m so tempted to hibernate until all the snow melts.  Driving in snow is scary.  Crocheting is not.